Showing posts with label challenge. Show all posts

Friday, January 21, 2011

Challenge #7

Okay, since I have skipped the challenge for about a month now! Total slacker, I know!! Ha-ha. I am now going to just number them instead of using weeks, just in case I need to skip again. Not that I am planning to but just in case...you know to cover my a*s...

Frame It Friday..has a nice little ring to it, huh? So I had several picture frame ideas that I brought to life both were simple, simple, simple.

First, I really needed to decorate the girls room. The walls were pretty bare and if you remember my post last week regarding the wall colors in our home, well I will refresh your memory, they are all off-white. Sooo in my office I had a stash of basic black picture frames that I had bought on clearance at Bed, Bath & Beyond. They sell them in sets of 4, I had bought them a couple of years ago as I made a wall collage of pictures. I had several left and sitting not too far was an enormous stack of Alea's art work. I also had paint that I bought (craft paint from Wal-mart) when I was decorating Alea's nursery. So I just slapped a couple of coats of paint over the black frames, inserted fabulous 3 year old daughter's art work and Viola!


I made 7 of them and I will have to say, I love them! Love seeing her artwork!

Next, I have this piece of art (my Aunt's) via my grandmother. I love this piece. As you can see the frame is mostly gold. Clearly it was framed many a years ago. So bust out my black craft paint from Wally-world and here you go.

Very happy with the result! Have you done any easy, fun projects lately? Tell me about them!
Happy Friday! I have a newborn photo session next week and this week I happened to be reading one of my favorite blogs The Pioneer Woman and one of her guest's posted about this incredible photographer. I can't wait to get my lens in front of that baby next week now. I will definitely be drawing a little inspiration from Kerrianne Brown. Can you say AMAZING? Love her style!

Tuesday, December 21, 2010

Fudge, Fudge, Fudge & Easy Last Minute Gift

Another one of my favorite things to make for the holidays is FUDGE! Love it! The recipe I use is

Rachel Ray's 5 Minute Fudge.

1 bag of morsels (that word makes me laugh and I'm not sure why), I prefer milk chocolate but you can use dark, semi-sweet or whatever you like.
1 can of Sweetened condensed milk
nuts or anything else you want to add in or you don't have to add anything

In a double broiler (I just use a bowl on top of a pot) melt the morsels (!) and the add the can of milk. Once everything is melted add in your extras if you have any. FYI you don't want to continue to heat the mixture once you add nuts or whatever because that will make soft and not crunchy. Get a pan (I like to use my toaster pan), spray with cooking spray. Pour mix into pan. I refrigerate for an hour but it sets almost immediately so you don't have to. Just wait a few minutes and cut and eat!

Great to put in small bags and give to teachers, neighbors, friends....


Do you have a kid on your list but don't really know what they are into? My back-up plan for all kids gifts is ART SUPPLIES! You can't really go wrong, pretty much all kids boys and girls love to draw and color. I keep a box stocked with markers, crayons, paint, construction paper, etc... Whenever I need a kid's gift at the last minute, I just fill a bag up from my box!  Also a great idea when your kids are driving you crazy and you really need to finish something. Let them pick from the box. Alea actually has a big bag with tons of supplies and I let her have at it. FYI washable paint and markers are 100x easier to clean up or get out of things than crayons! So if your kid get carried away and likes to mark on the floor, walls, couch...give them markers and paint, NO CRAYONS :)

Sunday, November 28, 2010

Week 6 Challenge

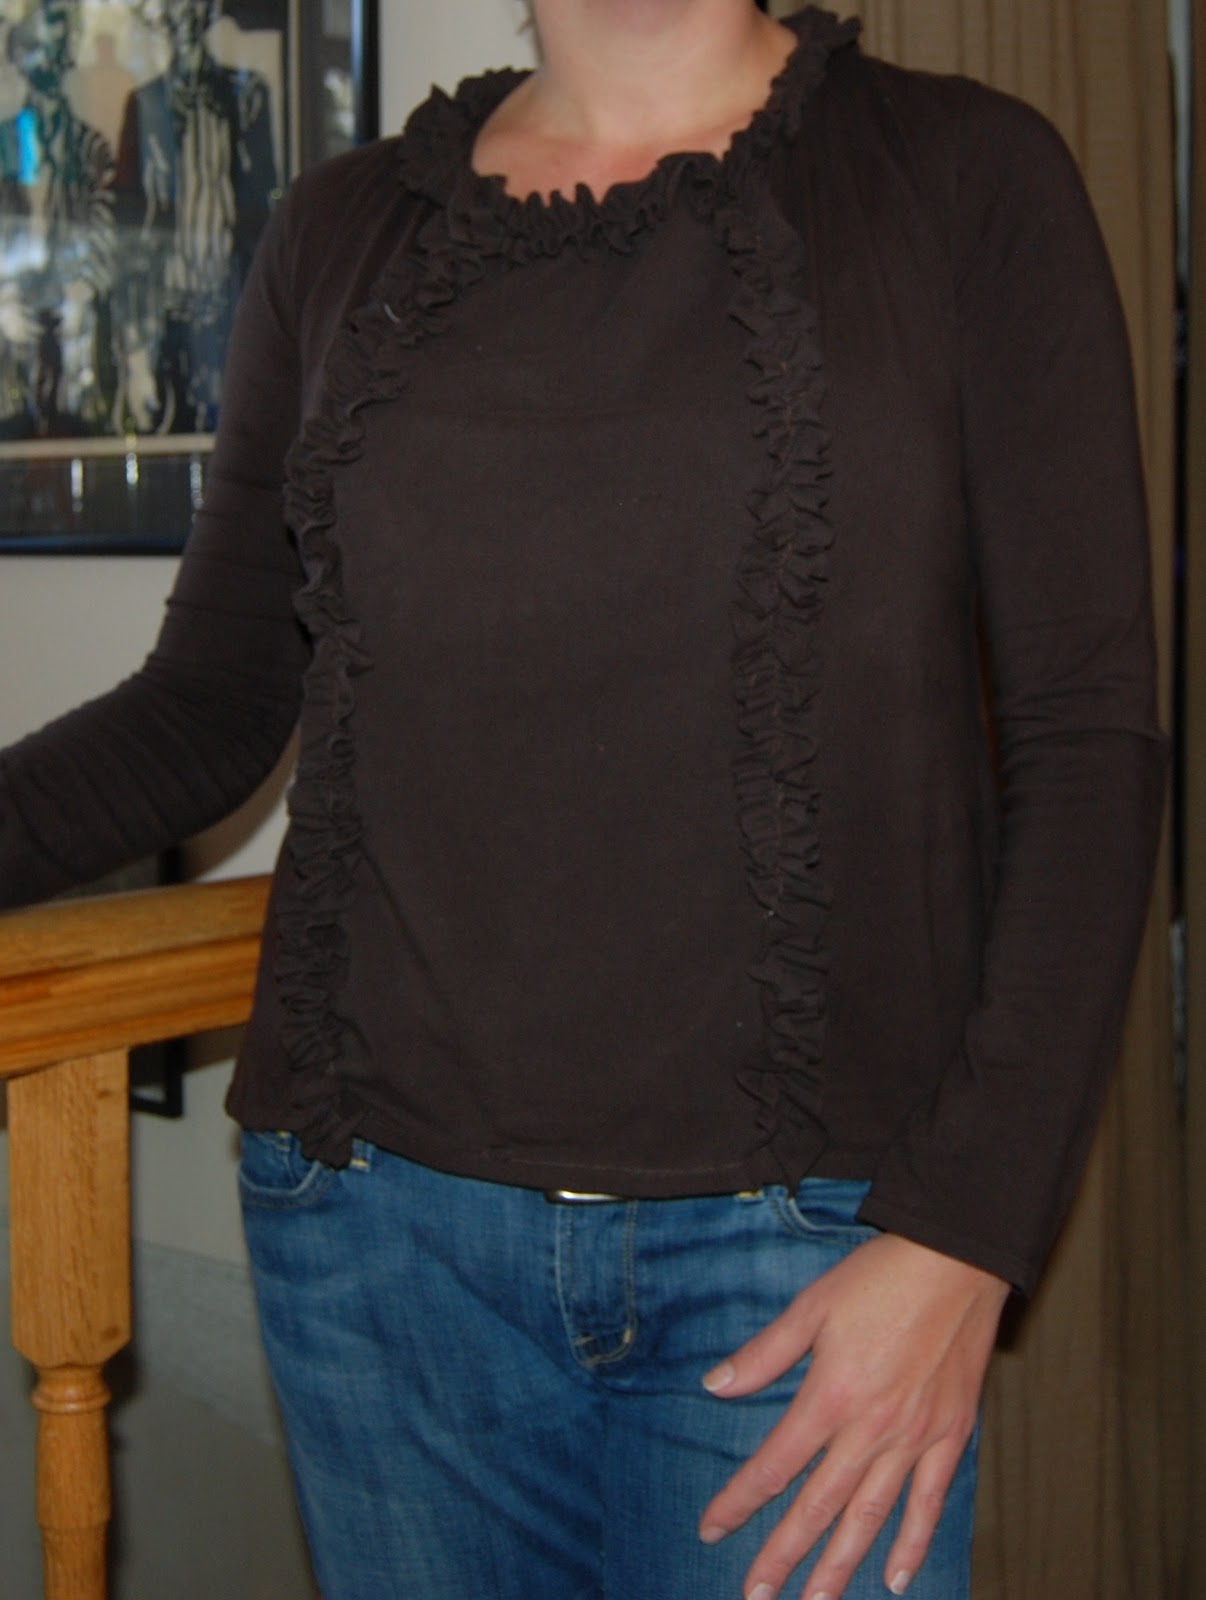
Okay, sorry I am late posting...I am not sure what I have been doing the past couple of days...So for Week 6 Challenge I decided to make use of some old t-shirts that are no longer flattering on my lovely Mommy figure, we will just say that the tummy isn't quite as flat as it used to be. I had a whole bag of t-shirts I assume I was keeping just waiting for my stomach to be like it was 4 years ago.  Since the shirts were pretty tight, I decided to make 1 shirt out of 2. The shirts were both where brown, one was long sleeve and one was short sleeve. I took the short sleeve shirt and cut a panel out from the center front of the shirt, it was about 8 inches wide. I then sewed clear elastic to the neckline of that piece. I cut straight down the middle of the long sleeve shirt and sewed my panel into the cut area of the long sleeve. I then cut strips out of the short sleeve shirt about 1 1/2" wide and sewed clear elastic down the center of the strips. Then I pinned and sewed the ruffled strips down my 2 seam lines on the front of my shirt and around the neck. Now it is comfy and doesn't hug my belly!
Not too shabby, huh?

I hope everyone had a wonderful Thanksgiving! Remember the more love you put out in the world the more you get back! Happy Sunday!

Friday, November 19, 2010

Thankful Giveaway & Week 5 Challenge

This week I made my girl's dresses for up coming holiday parties.
Of course they had to be just alike! Alea now loves to dress like her baby sister :)


I promise that even though these dresses are o'so cute in the pics, they are 100% times better in person.  Bet you want one of these for the sweet little girl in your life too, huh? And guess what? I am going to give you a dress just like these. Yep! I have enough fabric for just one more! I am thankful that you are reading this and that you support Bebe Dulce. I can make any size from 3 months to a 4T and I will even let you customize the embellishments satin ribbon bow, rosette flower, cinched sleeves, long sleeves, 3/4 sleeves).
  ANYONE can enter, this is what you gotta do to get your name in the pot for this fabulous dress.

Mandatory entry: Leave a comment here and tell me who would wear this dress if you won.
5 Extra Entries: Purchase something from our website http://www.bebedulceaspen.com/ (remember we are offering 20% off all orders too plus FREE shipping. Once your order is complete, I will refund you the 20%)
Extra entry: Suggest 20 people to "like" Bebe Dulce on Facebook. Leave a comment here that you did.
Extra Entry: Tweet @bebedulceaspen that we have an incredible giveaway happening NOW and
everyone should enter!
Extra Entry: Post a photo of your sweet baby in their Bebe Dulce on our Facebook page.
Extra Entry: Go to our website, on our contact page tell us your absolutely favorite Bebe Dulce item.

Giveaway ends next Friday, November 26.

Thank you for reading our blog, shopping our website and liking us on facebook!
We are here because of you!

And don't forget, get the sweet babies in your life Bebe Dulce for the holidays!
20% off all orders plus FREE shipping.
(Once your order is complete, I will refund you the 20% via the way you paid)


Friday, November 12, 2010

Week 4 Challenge Part 2

Okay, I was feeling a bit lame about this weeks challenge (since it took less than 5 minutes!) so I decided to add a second lame part. Lame meaning it took me way less than 5 minutes for this part. Definitely not lame in what I did because it was exactly what I needed/wanted.

So I took the same sweater that I made the neck warmer for Alea and sewed above the neck seam all the way around the turtle neck. Cut off the turtle neck. Folded the end to hem to the width I wanted and made myself a ear/head warmer. Those of you who know me at all know that I wear my hair up pretty much everyday. The only problem with that in the winter is that putting a hat on means taking my hair down and then immediately putting it back up once I secretly take the hat off. I needed something to cover my ear and head and be able to leave my hair up. Note this is for me I'm just quite as good of a model....
Pretty cute, huh? Please ignore the sour face, the shadows and the food/dirt or whatever is on the wall. Have a great weekend!

Thursday, November 11, 2010

Week 4 Challenge

Well, before I get to the Challenge project. What do you think about the new look? When I logged on this morning to write my post, I guess I was feeling a little frisky and decided to update the look. I like change. Something fresh and new since the only thing new around here is more snow. We haven't gotten much but the last 3 or 4 nights we have gotten a few inches each night. Anyway, I hope you like the new look!

This weeks project came to mind when we are getting all bundled to go outside. I like scarves and where them pretty much all year except for the few super warm months (which is mainly June, July and August here) even those months, if I get out at night I wrap a scarf on. Well, since my precious daughter wants anything and everything that I have, she MUST wear a scarf as well. After a couple of times of playing outside and her playing with her scarf and it falling into the nasty mud, where the snow has melted, I decided it was time she have her own scarf. I almost just made her a scarf with a button or something but then it dawned on me the new trend of the neck warmer scarf. Of course I headed straight to the thrift store and bought this fabulous sweater.
I made sure to get acrylic so that it would be soft not itchy and since I am slightly anal about things matching or at least going together. I got one that will go with pretty much everything. So all I did was sew a zig-zag seam straight across under the armpits all the way around. Then cut the top part off .  There you have it, a cute little neck warmer that will not drop in the mud!
Does it count if as my project if it took less than 5 minutes?

Saturday, November 6, 2010

Week 3 Challenge

So for a while now I have been designing new things for Bebe Dulce. I am going to start adding more boutique style clothes to Bebe D in the Spring. So currently I am making samples and choosing fabric. I also wanted to make dresses for the girls for the holidays. I made the first round with extra fabric I had, as not to mess up the "real" fabric since I was tweaking a pattern. Here they are! I am really happy with the way they came out. I can't wait to make them in the "real" fabric. My only issue is that it is nearly impossible to take pics of your own children. My kids just don't seem to want to cooperate, Alea especially. Emme just can't sit still long enough. I promise I am a better photographer than this :)


What do you think? Both girls wore their dress yesterday and got tons of compliments as we shopped and strolled through town! They were perfect with leggings underneath!

Friday, October 29, 2010

Week 2 Challenge

Okay for week 2, I decided to make a sweater dress for Alea. I love sweater dresses for kids and when Emme wore one of hers the other day, Alea said that she needed one like it. I had gotten this sweater at the thrift store for $8, it is 50% cashmere and 50% silk, sooo incredibly soft. I was originally going to re-design it for myself...but you know how that goes.

First thing I did was wash and dry it. The main reason I did this was because the care label says "Dry clean only" and I wanted to see what washing and drying would do. I can tell you that there is no way I am going to make (or buy for that matter) my kids any clothes that I will be dry cleaning. So, I think it barely shrank, it seemed just barely smaller, maybe.

I tried it on Alea and luckily the length was perfect and the neck opening was good too. So I have a basic dress pattern that I made out of one of Alea's dresses and then I adjusted as needed.


I cut off the sleeves on the dress side of the arm pit. I marked and sewed the dress width to fit. Then I took one of Alea's long sleeve shirts (the dress pattern I have is short sleeve) and matched it up with the sweater sleeve. I matched up the cuffs, so I would not have to mess with making/changing the cuff. I cut the sleeve where needed and trimmed up the width to fit. Then I re-attached the sleeves and viola! There was my dress!


Of course I had to embellish it a little. So I took some cotton/linen type material and cut 3 pieces the width and length of my yard stick. I sewed a strip of clear elastic down the center of one of the pieces and then sewed it around the dress in the waist area. Then I took the 2 other pieces of my fabric, sewed them together to make one long strip , then sewed clear elastic at the bottom edge of the fabric. I rolled that fabric together to make a rosette. Then hand sewed the bottom of the rosette, hand sewed a piece of felt over the bottom of the rosette and hand sewed the rosette to the dress. It took about an hour, so it's definitely a nap time project. When I do projects, I time them by how many nap times I need to make it :)


What do you think?? I made it a little big so she could were it all winter and also so she could wear a t-shirt and leggings underneath.


And if you are wondering where my Mom's challenge projects are, well they are coming. She is not so great with computers...we are working on sending me the pics and info :)


Please ignore the goofy poses, this is the best I could get :) Have a great Halloween weekend!

Friday, October 22, 2010

Week 1 Challenge

This week I made several things since I got so inspired by these great sewing and crafting blogs, my favorite is this adorable Ruffle dress with leggings made out of these shirts I got on sale at Gap. It is all about "re-fashioning" clothes. Now I have a huge pile of tees, sweaters and anything else I could find in my closet to redesign.
I made my own pattern from a dress and leggings that Alea had in her closet. I used the hem of the shirts for the hem of the dress and leggings. I just cut strips of fabric and made the ruffles. I just added the ruffles where-ever. I have been dying to figure out how to make these rosettes out of fabric and found a website tutorial that explained it. So I definitely had to add a rosette. The shirts were super soft, the first thing that Alea said when she put it on was "this is soft, Momma!" This outfit only took about 2 hours from start to finish. The only thing I wish I would have done better was lining the stripes up. Next time I will. Here are a couple of the websites where I got my inspiration. Be full-warned that you will be going through your closet and finding things to redesign! I hope you are inspired!

Sutton Grace

How Does She

Sunday, October 17, 2010

The Challenge

Most people know that my Mom is very crafty. I learned to sew, make, create and everything in between from her. I grew up making things constantly and I of course still love to. Since our lives tend to be so busy, many times you find it has been weeks even a month before you realize that you haven't made anything for fun. Obviously, I do make things for work but unless I am designing something new, I don't count it. This past week I have come across a few awesome websites/blogs where these incredibly talented women talk and write tutorials on what they create. Well I was incredibly inspired to get back into the fun, designing world. So, I called my Mom up and asked her if she was ready for a challenge! Each week we had to make something for fun. Every weekend we would email each other pictures of what we made. The one stipulation was that you could not buy anything, you had to use materials that you already had. The exception to this rule was you could go to the thrift store (you will understand more in later posts) Just a little something to keep us creating, since it is what we both love and enjoy. Well this was Friday afternoon, I sent her a couple of the links of the sites that I was inspired by (I will share them all with you as I post things similar). Needless to say neither one of us slept a wink that night excited to create new goodies. Well I finished my project in an hour and a half Saturday afternoon. I have been wanted ot make these wide leg pants from this fabric that I like. I got a pair of my pants that were the style I wanted to use and made a pattern from the pants. Actually I didn't make the pattern (If you know me I am a little impatient and that takes too long but now I love the pants and wish I had the pattern on file). Anyway the pants turned out super cute, just what I invisioned! Here are a few pics, I promise they are MUCH cuter in person. It is hard to take a pic of yourself! and I am not a great model! They are your basic wide leg pant with a wide waistband. I know the fabric is a little funky but I love them!